Battery switch on travel trailer function is crucial for managing your RV’s power. Understanding how your battery switch works—whether it’s a simple single-pole or a more complex double-pole double-throw—is key to safe and efficient power usage. This guide dives into the various types of switches, their operation, troubleshooting tips, and essential safety precautions, ensuring you’re equipped to handle any power situation on the road.
We’ll cover everything from connecting and disconnecting batteries safely to performing regular maintenance and even replacing a faulty switch. We’ll also explore how your battery switch interacts with other electrical components in your travel trailer, like the converter, inverter, and solar panels, providing a holistic understanding of your RV’s power system.
Types of Battery Switches in Travel Trailers
Choosing the right battery switch for your travel trailer is crucial for safe and efficient power management. Different types offer varying levels of control and protection, impacting how you use your house and chassis batteries. Understanding their differences helps you select the best option for your needs.
Single-Pole Battery Switches
A single-pole switch controls a single circuit. In a travel trailer, this typically means it controls either the house battery or the chassis battery independently. It’s a simple on/off switch, disconnecting the battery from the rest of the electrical system. This is the simplest and most affordable option, but offers limited control.
Double-Pole Battery Switches
Double-pole switches control two circuits simultaneously. This is commonly used to isolate both the house and chassis batteries from the trailer’s electrical system at once. This improves safety by preventing accidental shorts or backfeeding. A double-pole switch offers more comprehensive protection compared to a single-pole switch.
Double-Pole Double-Throw (DPDT) Battery Switches
A DPDT switch provides the most control. It allows you to connect either the house battery, the chassis battery, or both to the trailer’s electrical system. It offers three positions: “House,” “Chassis,” and “Both” or “Off.” This type of switch is excellent for managing power efficiently, allowing you to use either battery individually or combine their power.
Comparison of Battery Switch Types
| Switch Type | Function | Pros | Cons |
|---|---|---|---|
| Single-Pole | Controls one circuit (house or chassis battery) | Simple, inexpensive | Limited control, less safety |
| Double-Pole | Controls two circuits (house and chassis battery) simultaneously | Improved safety, isolates both batteries | Less control than DPDT |
| Double-Pole Double-Throw (DPDT) | Connects house, chassis, both, or neither to the system | Most control, efficient power management | More complex, slightly more expensive |
Connecting and Disconnecting Batteries: Battery Switch On Travel Trailer Function
Properly connecting and disconnecting your travel trailer batteries is crucial for safety and to prevent damage to your electrical system. This process varies slightly depending on the type of battery switch you have installed, but the core principles of safety remain the same. Always remember to disconnect the negative (-) terminal first when disconnecting and connect it last when connecting.Connecting and disconnecting batteries involves a straightforward procedure, but safety should always be the top priority.
Improper handling can lead to sparks, short circuits, and even explosions. This section Artikels the steps for various switch types and emphasizes essential safety measures.
Connecting and Disconnecting Batteries with a Simple On/Off Switch
A simple on/off switch is the most basic type. It provides a single point of connection and disconnection for your battery bank. This switch is usually found near the battery itself.
- Safety First: Always wear safety glasses to protect your eyes from potential sparks or acid splashes. Use insulated tools to avoid accidental shorts.
- Disconnecting: Turn the switch to the “OFF” position. Then, disconnect the negative (-) cable from the battery terminal using a wrench. Next, disconnect the positive (+) cable.
- Connecting: Connect the positive (+) cable to the battery terminal first. Then, connect the negative (-) cable. Finally, turn the switch to the “ON” position.
Connecting and Disconnecting Batteries with a Battery Isolator
Battery isolators allow you to charge multiple batteries independently from different sources (like your tow vehicle’s alternator and shore power).
- Safety First: Always wear safety glasses and use insulated tools. Before working on any electrical connections, ensure that the system is turned off and the negative (-) cables are disconnected.
- Disconnecting: Turn off the isolator switch. This will disconnect the charging circuit. Then, disconnect the negative (-) cables from the batteries. Disconnect the positive (+) cables.
- Connecting: Connect the positive (+) cables to the batteries. Then, connect the negative (-) cables. Turn the isolator switch on.
Connecting and Disconnecting Batteries with a Battery Selector Switch
A battery selector switch allows you to switch between different battery banks (e.g., house batteries and starting battery) or to completely disconnect the batteries from the trailer’s electrical system.
- Safety First: Always wear safety glasses and use insulated tools. Before making any connections, ensure that all switches are in the “OFF” position.
- Switching Between Banks: With the switch in the “OFF” position, carefully move the switch to select the desired battery bank. Ensure the switch clicks firmly into place.
- Disconnecting: Rotate the switch to the “OFF” position to completely disconnect the batteries. Then, disconnect the negative (-) cables from the battery terminals.
- Connecting: Connect the negative (-) cables to the battery terminals. Then, rotate the switch to the desired position to connect the chosen battery bank.
Connecting a Battery to a Switch and the Trailer’s Electrical System
This process illustrates the connection of a single battery to a switch and then to the trailer’s electrical system. Assume a standard setup with positive (+) and negative (-) terminals on both the battery and the switch.
- Preparation: Gather your tools: insulated wrench, cable lugs (if needed), wire connectors, and safety glasses.
- Battery to Switch Connection: Securely attach the positive (+) cable from the battery to the positive (+) terminal of the switch using a cable lug and a suitable connector. Repeat this process for the negative (-) cable.
- Switch to Trailer Connection: Connect the positive (+) and negative (-) cables from the switch to the corresponding terminals of your trailer’s electrical system. Use appropriately sized wire connectors and ensure tight connections.
- Safety Check: Inspect all connections to ensure they are secure and there are no exposed wires. Double-check that all connections are properly insulated.
Troubleshooting Common Battery Switch Issues
Your travel trailer’s battery switch is a crucial component, ensuring power flows correctly to your appliances and preventing accidental drain. Problems with this switch can leave you stranded without power, so understanding common issues and how to troubleshoot them is essential. This section details typical problems and provides step-by-step solutions.
Switch Failure
A faulty battery switch can manifest in several ways, from simply not switching power to completely failing internally. This can be caused by wear and tear, corrosion, or even a manufacturing defect. Diagnosing a switch failure often involves checking for continuity using a multimeter. If the switch doesn’t show continuity in the expected positions (on/off), it’s likely the culprit.
Troubleshooting typically involves replacing the switch entirely. It’s advisable to purchase a replacement switch that matches the amperage rating of your battery system to avoid overloading and potential hazards.
Corrosion
Corrosion is a common enemy of electrical connections, and your battery switch is no exception. Salt air, moisture, and dirt can accumulate on the terminals and internal components, hindering the flow of electricity. Identifying corrosion is usually straightforward; you’ll see a whitish or greenish buildup on the terminals and connections. Troubleshooting corrosion involves carefully cleaning the affected areas.
Use a wire brush to remove loose corrosion and a battery terminal cleaner to neutralize any remaining residue. Apply a dielectric grease to the cleaned terminals to prevent future corrosion.
Loose Connections
Loose connections, often overlooked, can also cause significant problems with your battery switch. Vibrations during travel can loosen bolts and wires, resulting in intermittent power or complete power loss. Diagnosing loose connections requires a visual inspection of all wiring and terminal connections at the switch. Gently tighten any loose bolts or screws. If wires are frayed or damaged, they should be replaced.
Always ensure all connections are secure and properly tightened before reconnecting the battery.
Troubleshooting Steps
Before beginning any troubleshooting, disconnect the negative terminal of your battery to prevent accidental shocks. Safety first!
Here’s a flowchart to guide you through the troubleshooting process:
- Check for Power: Verify if your appliances are receiving power. If not, proceed to the next step.
- Inspect the Switch: Carefully examine the battery switch for any visible signs of corrosion, loose connections, or damage.
- Test for Continuity: Use a multimeter to check for continuity across the switch terminals in the “on” and “off” positions. Consult your multimeter’s instructions for proper testing procedures.
- Clean Connections: If corrosion is present, clean the terminals and connections thoroughly using a wire brush and battery terminal cleaner. Apply dielectric grease after cleaning.
- Tighten Connections: Ensure all bolts and screws are securely tightened.
- Replace the Switch: If the switch shows no continuity or is damaged, replace it with a new switch of the correct amperage rating.
- Reconnect the Battery: After completing repairs, carefully reconnect the battery’s negative terminal.
- Test Appliances: Check if your appliances are now receiving power.
Battery Switch Maintenance and Replacement
Regular maintenance of your travel trailer’s battery switch is crucial for ensuring reliable power and preventing costly repairs down the line. Neglecting this simple task can lead to corrosion, poor connections, and ultimately, switch failure, leaving you stranded without power. This section details the importance of regular maintenance and the steps involved in both cleaning and replacing your battery switch.
So, you’re planning a trip? Awesome! First things first: get yourself sorted with travel insurance. Check out Aon travel insurance for some solid options; they’ve got various plans to suit different budgets and trip types. Once you’re covered, think about your in-flight entertainment. If you’re an audiophile, you’ll want to check out this guide on audiophile travel setup to ensure your listening experience is top-notch, even at 30,000 feet.
Happy travels!
Cleaning and Inspecting a Battery Switch
Cleaning and inspecting your battery switch should be a part of your regular pre-trip checklist. Accumulated dirt, grime, and corrosion can hinder the switch’s ability to make a solid connection, leading to voltage drops and reduced battery performance. A visual inspection should be performed at least every six months, or more frequently in harsh environments.To clean the switch, start by disconnecting the batteries completely.
This is a critical safety precaution to prevent accidental shocks. Use a wire brush or a specialized battery terminal cleaner to remove corrosion from the switch terminals and surrounding areas. Pay close attention to any areas where the wires connect to the switch. After cleaning, apply a corrosion inhibitor, such as dielectric grease, to the terminals to help prevent future corrosion.
Finally, reconnect the batteries and test the switch functionality.
Replacing a Faulty Battery Switch
If your battery switch is consistently malfunctioning despite cleaning and inspection, it’s time for a replacement. Before beginning, disconnect the batteries completely. Take photos or make detailed notes of the wiring configuration before removing any wires to help with reinstallation. This is especially important if you have multiple batteries or complex wiring setups.Unscrew the switch from its mounting location.
Carefully remove each wire, noting its position. Install the new switch in the same location, ensuring it’s securely fastened. Reconnect the wires according to your notes or photos, ensuring a tight connection at each terminal. Once all connections are made, reconnect the batteries and test the switch to confirm proper operation. If you are unsure about any step of the process, consult a qualified RV technician.
So, you’re planning a trip? Awesome! First things first: get yourself sorted with travel insurance. Check out Aon travel insurance for comprehensive coverage. Then, if you’re an audiophile like me, don’t forget your tunes! Planning your audiophile travel setup beforehand is key to enjoying those epic sunsets with your favorite tunes.
Seriously, good sound makes any trip better.
Preventative Maintenance Schedule for Travel Trailer Battery Switches, Battery switch on travel trailer function
A preventative maintenance schedule can help extend the life of your battery switch and prevent unexpected problems.
Consider this schedule:
- Monthly: Visually inspect the switch for any signs of corrosion, loose connections, or damage.
- Semi-Annually (every six months): Thoroughly clean the switch terminals and apply dielectric grease.
- Annually: Perform a complete inspection, including checking for loose mounting screws and overall switch integrity. Replace if necessary.
This schedule is a guideline and may need adjustments based on your usage frequency and environmental conditions. More frequent maintenance may be necessary in humid or salty environments.
Battery Switch and Electrical System Integration
Your travel trailer’s battery switch is the central control point for your 12-volt DC power system, acting as a crucial link between your batteries and the rest of your electrical components. Understanding its role in the larger electrical system is key to preventing issues and ensuring reliable power. This section details how the battery switch interacts with other components to manage power flow effectively.The battery switch doesn’t just turn the power on and off; it manages the flow of power from your batteries to various systems in your trailer.
It’s the gatekeeper, deciding which circuits receive power and when. This interaction ensures that your appliances and systems receive power efficiently and prevents potential damage from incorrect wiring or power surges. Different battery switches offer varying levels of control, from simple on/off switches to more complex systems allowing for separate battery banks and more precise power management.
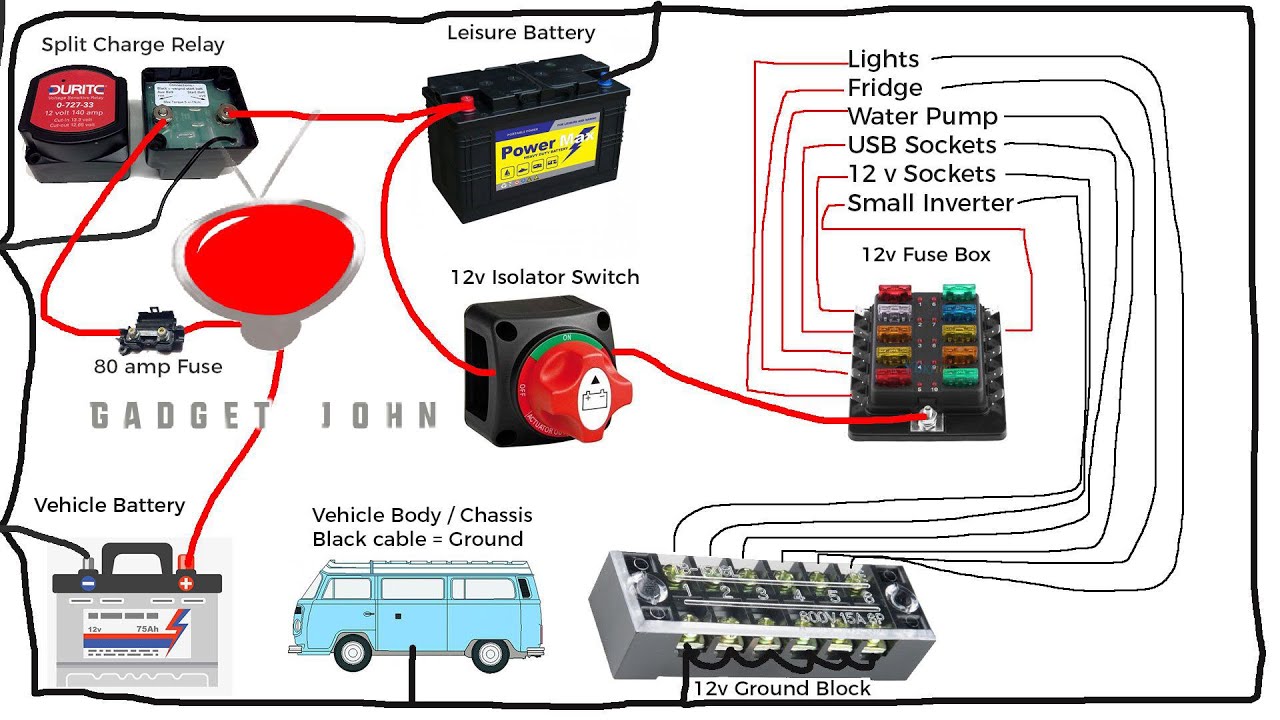
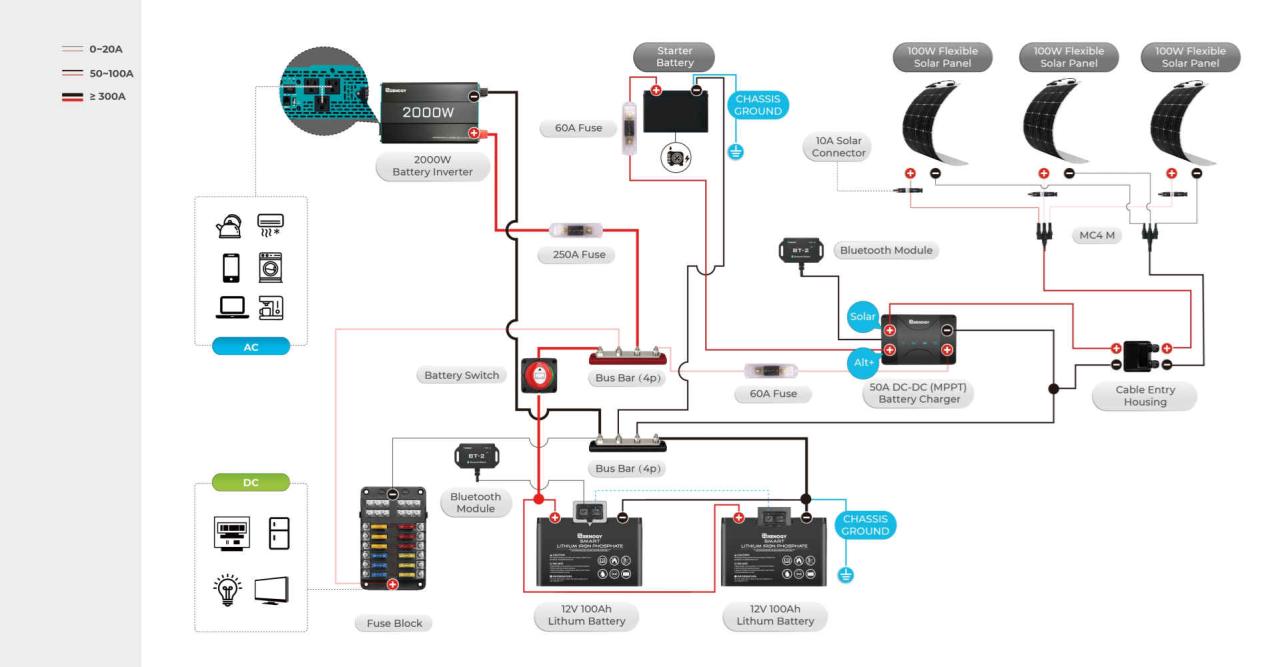
Power Flow Through the Battery Switch and Electrical System Components
Imagine a simple diagram. At the heart sits your battery switch, represented by a simple box labeled “Battery Switch.” Two lines lead into this box, representing your battery banks (if you have two). These lines are labeled “Battery Bank 1” and “Battery Bank 2” (if applicable; otherwise, just “Battery Bank”). From the battery switch, several lines branch out, each representing a major component of your electrical system.One line leads to your “Converter.” This device transforms 12-volt DC power from your batteries into 120-volt AC power for your household appliances.
Another line goes to your “Inverter,” which performs the opposite function, converting 12-volt DC to 120-volt AC, often for higher-power appliances. A third line might connect to your “Solar Panel System,” which charges your batteries directly when sunlight is available. Finally, several smaller lines branch off to represent other 12-volt DC appliances such as lights, water pumps, and refrigerators (if it runs on 12V).
The flow of electricity is controlled by the position of the battery switch; when it’s turned “on,” power flows through the selected circuits to the connected appliances and systems. When it’s “off,” the flow is interrupted, protecting your batteries and preventing accidental discharge. Some switches even offer a “both” or “off” position for complete isolation of your batteries.
Mastering your travel trailer’s battery switch isn’t just about convenience; it’s about safety and extending the life of your batteries and electrical system. By understanding the different switch types, following safe connection procedures, and performing regular maintenance, you’ll ensure smooth and reliable power for all your adventures. Remember, always prioritize safety and consult a professional if you’re unsure about any aspect of your RV’s electrical system.
FAQ Summary
What happens if I leave my battery switch on all the time?
Leaving your battery switch on constantly can drain your batteries, especially if you have parasitic loads (devices drawing power even when turned off). It’s best to turn it off when not using the trailer for extended periods.
How do I know if my battery switch is bad?
Symptoms of a bad battery switch include no power to appliances, flickering lights, or a blown fuse. Check for corrosion, loose connections, or visible damage to the switch itself.
Can I use a battery switch from a different RV?
Potentially, but ensure the amperage rating is sufficient for your system and the wiring is compatible. It’s safest to use a switch designed for your specific RV’s electrical setup.
What type of fuse should I use with my battery switch?
The appropriate fuse size depends on the amperage rating of your battery switch and wiring. Check your RV’s manual or consult a qualified electrician to determine the correct fuse size.
